In our previous article „Why Clean the Back of Your Refrigerator?“ we explained why regular dust cleaning is not just a recommendation but a necessity. A dust-free refrigerator lasts longer, consumes less electricity, and breaks down less often!
Now it’s time to get practical and learn how to clean your refrigerator from dust properly. The process is simple and won’t take much time, especially if you follow our step-by-step instructions.
Preparation for Cleaning
To ensure the cleaning process is quick, safe, and effective, you need to do some preparation. Gather the necessary tools and ensure you have easy access to the back of the refrigerator.

Step 1: Safety First! Unplug the Refrigerator
The very first and absolutely essential step is to unplug the refrigerator from the power outlet! Before touching the back panel or moving the refrigerator, make sure to remove the plug. This is a safety precaution you must not skip!
Step 2: Ensure Access to the Back Panel
To reach the dusty areas, you need to pull the refrigerator away from the wall. Do this carefully:
- Clear the area: Remove any objects that might obstruct movement, such as chairs, boxes, or other appliances.
- Move it gently: Avoid sudden jerks. Slowly pull the refrigerator towards you while holding it on both sides. If it’s too heavy, ask for help to prevent back strain or floor damage.
- Watch the wires and tubes: While moving the refrigerator, make sure you don’t pinch or damage any cables or tubes at the back. Move it just enough to comfortably access the back panel.
Step 3: Gather the Necessary Tools and Materials
For cleaning, you’ll need the following items:
- Vacuum cleaner with a brush attachment – This is your primary tool for removing dust. A brush attachment allows you to clean the surface without scratching or damaging the refrigerator’s components. If your vacuum has adjustable suction power, use the lowest or medium setting for this task.
- Soft brush or paintbrush – A soft-bristled brush is helpful for removing dust from hard-to-reach places, such as between tubes, in corners, and in crevices. It’s also great for areas where a vacuum cleaner cannot reach.
- Damp cloth (optional) – Use a slightly damp cloth for any stubborn dirt on the back panel. However, be very careful with moisture! The cloth should be well-wrung out and never dripping wet.
- Dry cloth – Use a dry, soft cloth to wipe down any areas where you used a damp cloth.
- Gloves (optional) – Wearing gloves can protect your hands from dust and dirt, making the process more hygienic.
Prepare all your tools in advance so they’re within reach when you start cleaning.
Key Areas Where Dust Accumulates (Based on Refrigerator Type)
To effectively clean your refrigerator, it’s important to know where dust tends to accumulate. The exact spots will vary depending on the refrigerator’s design.
Type 1: Refrigerators with a Hidden Radiator
(This design is common in the U.S. and in modern models worldwide.)
In these refrigerators, the cooling radiator is hidden inside the casing, so you won’t see exposed coils or grids at the back. The main dust accumulation areas are:
- Lower section (kickplate area) – In most hidden-radiator models, the radiator is located behind a decorative front panel (kickplate) at the bottom of the fridge. Dust accumulates behind this panel, on the radiator, and around it. This is the primary area to clean.
- Side panels – In some models, the radiator is integrated into the side walls. If the side walls feel warm when the fridge is running, dust may be accumulating there, especially near ventilation openings.
- Under the refrigerator – Even with a hidden radiator, dust collects underneath, affecting airflow and heat exchange.
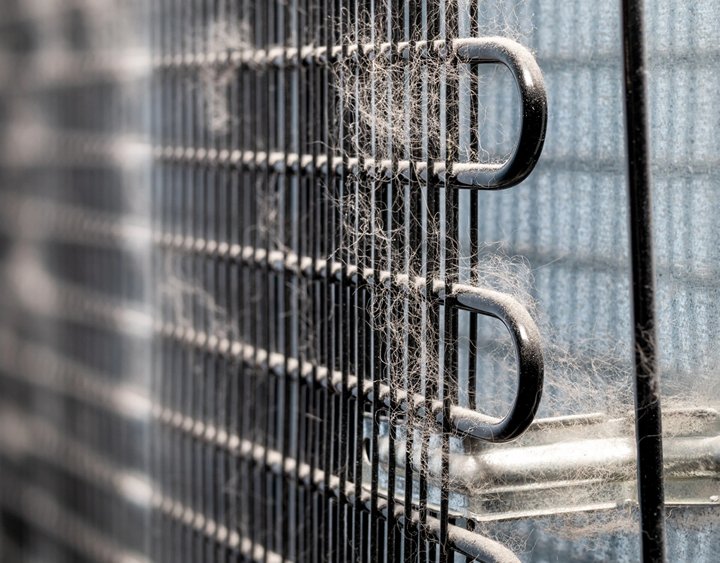
Type 2: Refrigerators with an Exposed Radiator on the Back
(This traditional design is common in European and Asian markets, as well as in older U.S. models.)
In this case, the main dust accumulation points are:
- Back panel – The radiator and condenser coils are visible at the back, and this is where the most dust gathers.
- Compressor area – At the lower back of the refrigerator, dust builds up around the compressor and adjacent tubes.
- Underneath the refrigerator – Don’t forget to vacuum under the fridge, as dust accumulates there too.
- Ventilation openings – If your fridge has ventilation grilles on the back or sides, check and clean them as well.
Step-by-Step Cleaning Instructions
Use your vacuum cleaner with the brush attachment to thoroughly clean all dust-collecting areas, based on your refrigerator type.
For Type 1 Refrigerators (Hidden Radiator):
- Clean the lower section (kickplate area) – If possible, carefully remove the decorative front panel (kickplate) at the bottom of the fridge. It’s usually attached with clips or screws.
- Vacuum the radiator and surrounding space – Remove dust from the panel itself and inside the compartment. If the panel cannot be removed, vacuum through the ventilation grilles using a narrow nozzle.
- Pay extra attention to the bottom area – This is where most dust accumulates in hidden-radiator models.
For Type 2 Refrigerators (Exposed Radiator on the Back):
- Vacuum the back panel – Focus on the condenser coils and radiator grid.
- Vacuum around the compressor at the bottom.
- Clean the lower part of the refrigerator and ventilation openings (if present).
- Vacuum the side panels – If they contain ventilation openings or feel warm, they may need cleaning too.
- Vacuum under the refrigerator.
Final Steps
Once the cleaning is complete, return the refrigerator to its place and check its operation.
Step 1: Move the Refrigerator Back
Carefully push the refrigerator back into position, ensuring the cables and tubes are not pinched.
Step 2: Plug the Refrigerator Back In
Insert the plug into the socket. Make sure the cord is dry before plugging it in. If it got damp during cleaning, wait until it dries completely.
Step 3: Check if the Refrigerator is Functioning Properly
After plugging it in, listen for the sound of the compressor starting. After some time, check if the temperature inside the fridge and freezer is dropping. It usually takes 30 minutes to 1–2 hours, depending on the model, for the refrigerator to reach its normal operating temperature.
Additional tips
To keep your refrigerator dust-free for longer and prevent you from having to clean it too often, take note of a few simple tips:
- Regularly damp mop the floor around the refrigerator. Dust rises into the air from the floor. Regular wet mopping of the floor around the refrigerator will help reduce the amount of dust in the air and therefore on the back of the refrigerator.
- Using special filters for your vacuum cleaner. If you have a vacuum cleaner with a HEPA filter, it will trap even the smallest dust particles without releasing them back into the air. This is especially helpful for allergy sufferers and for keeping your home cleaner in general.
- Regularly check the back wall. Make it a habit to look behind your refrigerator periodically (like once a month) and visually assess the condition of the back wall. If you see that there is already quite a lot of dust accumulated, don’t put off cleaning it until later.
- Consider the operating conditions. If your refrigerator operates in dusty conditions (for example, there is a renovation in the kitchen or you have pets), dusting should be done more often than 1-2 times a year.
Conclusion:
As you can see, dusting your refrigerator is not a difficult task at all, which everyone can do. Following our step-by-step guide, you will be able to quickly and efficiently perform dust cleaning, ensuring its long and smooth operation. If you are having trouble cleaning or have noticed any problems with your refrigerator, Omega tech service experts are always ready to help and provide maintenance refrigerator service in San Diego.